Wednesday, November 6, 2013

The Hollee-Olive-Experiment...Take 1

It's been a while since I've posted...but so be it.  I keep apologizing for not posting very often but I've convinced myself that it's because I actually have a life...HAH!  Not really but it makes me feel better to fib to myself a little...

Ok here's the reason for this particular post...I need a new "go to" recipe...all of my recipes call for butter or vegetable oil.  I definately don't have a problem wiht butter - but...I'd really like to find a nice alternative.  lately I've been reading up on Olive oil in cakes.  It caught my interest so I thought I'd give it a try.  First - I decided to brush up on my science (Yes Mr. Patriquin - I said it...i'm voluntarily referring to science!).  I know that every ingredient in cake has a job to do and if I make any changes - I'll change the way the batter behaves.  Here's what I know...

  1. The minute the dry ingredients hit the wet, the clock starts to tick.  If I whip the dickens out of it until the batter is smooth - or wait too long to put it in the oven, I'll have a very fluffy - airy cake that won't hold together.  Kinda like a cake from a box mix.  Not awesome and completely un-decorateable.
  2. Cake gets the structure from the flour and eggs.
  3. Cake gets the moisture from sugar and fat
  4. Room temprature eggs mix more evenly and hold air better = less dense cake.
  5. Olive oil does not hold air.
In theory - if I let my eggs warm up and whip the crap out of the batter, theorhetically, I should have a reasonably fluffy cake that is moist and full of flavour - but stable enough to hold together nicely and be decorated.  Ok - I'm sold! 

 I referred to this recipe from Duo dishes it went together very easily - My spidey senses were tingling like crazy when it came time to add the lemon, though.  I'm not a fan of lemon and neither are most of the kids who eat my cake...I reached for the vanilla instead...then put it back and stuck to the recipe.  I can't fix/fiddle if I dont' know exactly what to fix/fiddle with.  Overall - at that point, I was pleased to say the least.  I was able to mix it more than I normally would - it doesn't make a huge batch - doesn't have a ton of sugar and has nothing that I can't pronounce - it's just good old fashioned cake. :)  In the oven it went and the house smells amazing!!!  It cooks quite quickly and stayed fluffy - and puffs up evenly.  All good signs.  I took it out of the oven to cool and it's really fluffy.  The recipe says to let it cool for 30 minutes before removing it from the pan...but it also says to line the pan with parchment (I skipped that step).  So - I took it out of the pan and it's maybe a little too fluffy...but i think if I let it cool a little, it would be fine.  Because I'm impatient, I sliced the ant hill dome off the center of it to taste it and BAM! Lemon!!  Then I asked kiddo to give it a try.  She is my cake berometer - the instrument by which I determine the success of a cake.  She's brutally honest and never lies to spare my feelings.  Love the kid for that.  Her verdict??  1st...she screwed up her face...then she stuck out her tongue and made a chewing attempt that looked like a donkey eating peanut butter.  Then she asked "did you put that lemon stuff back in it"??  Yup - it's a different recipe...her response??  "I don't like it".  I must take out the Lemon...

I did try another piece with some buttercream on it - but the flavour in the cake didn't blend well with the frosting, sooooo...baaaaaack to the kitchen I go.  First, I'll do my dishes from the 1st go-round, and then I'll give it a trey without the lemon.  I will not refer to science this time, though.  Sorry Mr. P. :)

Saturday, July 6, 2013

My new Fave cake!

I Love creating cakes - I really do!  Every one is a new challenge and I learn someting from each and every one.  Some cakes "click" I get crazy inspired and can't stop once I get started, while others just sortof come together as planned.

A few weeks ago, I started planning a Monster cake for a little guys 2nd birthday.  His Mom is one of my fave cake customers ever!  Between the two of us (me mostly) we decided on a monster theme - she gave me the color choices and my frosting-Ninja brain started spinning...and spinning...and spinning!!!

Lately, I've been trying to be a little more "grown up' about my cakes.  I tend to have a hard time restraining myself once I get going on a cake and need to be better at planning and stopping when it's time to stop.  So - for this big guy, I started with a sketch. 
I wasn't entirely sure how I would do the arms, but I knew he needed to be tubby and low and squatty with 3 horns and hairy shoulders, wings and a tail.
When I stacked the cake for him, he was super tall and I knew he needed support so I pushed in 3 solid dowels to help hold him up and keep bad things from happening...and then it was time to to turn him into a Monster. :)


I made his tail out of rice krispies adn marshmallow...but he still didn't look like a Monster.
Then I gave him a bottom lip and a belly and a tooth.  A little more like a Monster, but still...not a Monster.

When I added his horn, teeth and fur and was getting more  and more excited about him.  When I added the eyes, though, I seriously laughed out loud!  I was completely in Love with him and knew I was exactly on track. :)

Spikes on his tail, ears, horns and teh rest of his fur.  A few more details and then...he was done! :)

I couldn't stop smiling!  Seriously - How stinkin cute is he?!!! :)

I Love his little wings!!
And his littel face!  Hello! :)

 Overall, I think he's close enough to the sketch that I can say I followed it. :)  I'm super crazy excited about him (and the "peace sign" is actuall a "2", cuz the Birthday Boy is 2! :) )

Wednesday, June 5, 2013

Cake Decorating with grade 5

I've been promising kiddo for a couple of years now, that I'd do a cake decorating workshop with her class.  Somehow, I managed to work everything out this year and we are set up for Friday! :)  I've been planning like crazy to get ready for it all...and tonight I managed to bake 100 cupcakes tonight in preparation.  We have 22 students, and they'll each decorate 4.  To help with creativity, I've decorated 8 examples.   With the frosting tips we'll be using, and the frosting patterns we'll be demostrating, they'll be able to make any one of them. :)  I'm hoping that I have over prepared enough that it will all go well and everyone will have a great time. :) 


 Here are all 8 together...


This one is a "dirt cupcake".  A Swirl of chocolate frosting, topped with crushed chocolate wafer and topped with a fondant leaf.


This one is "Mystery fruit".  I swirl of multi-colored frosting, topped with a modeled tootsie roll piece for a stem and a green frosting leaf.
 This little Alien guy was just fun - a giant glob of green frosting - white for the eye and a mini chocolate chip for the pupil.  His mouth is a tiny piece of licorice string. :)
 This little guy is supposed to be a frog...I just think he's cute. :)
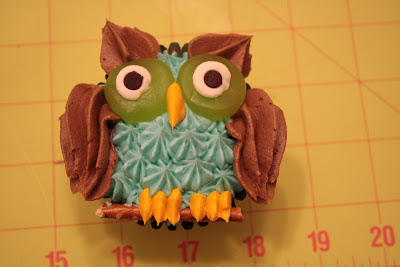
 Mr. Owl is piped stars in blue, with chocolate frosting for wings and ears.  His pupils are chocolate chips. His eyes are lifesaver gummies. :)  Oh - he's holding on to a pretzel stick...just cuz I thought it was cute. :)
 This one was super simple.  Blue swirls for sky, white squiggles for clouds and a piece of sour rainbow gummy for the rainbow. :)
 Sunflower - oreo cookie in the center and a leaf tip for the yellow petals and green leaves.
This one might be one of my faves.  A simple swirl of chocolate frosting, 3 giant globs of blue, 3 green leaves and chococlate sprinkles for the eyes. :)
So now...my kitchen is trashed and I'm beat!  but I took a few minutes to make a tea and have a seat and eat the one cupcake I made for myself to use up the frosting remnants. :) 
 
 
Isn't he fun??! :)  (He was delicious!)


Monday, May 13, 2013

DIY Garden Bucket (Part 1)


I have a plan!!  That plan is the creation of a super cute and very functional garden bucket of my very own!!  I have about a million-ish garden doo-dads that will fit beautifully in it - plus, I just kinda like them so dag nabbit - I'm gonna make one!! :) 

I saw these super cute buckets at the dollar store today for $3. (insert squeal of delight here!!) :)  I also have a mountain of fabric hidden away in my closet that has been screaming "sew something" at me for ages!!  (ummm....sorry roman shades...you don't inspire me at the moment. lol)  So - here's the beginning of it all...so far, I've made it as far as cutting out the pattern for the inside piece that will "line" the inside of my super cute bucet.  OH!  Rewind!!  I got the clever idea by browsing pinterest.  Specifically  this little gem!! :) It's the creative works from Hoosier Homemade! Lots of great stuff on her site!!

   So - fast forward to tonight...  I have an old roll of news print that I bought from the local newspaper back when they used to print locally.  Sadly - you can't get them anymore since they moved the printing to another site - but...i still have a partial roll and will enjoy every last bit of it. :)


 So - the first thing I did was tear off a hunk of paper big enough to wrap around my bucket.  I figured if I crumpled the bucket around the edges of the bucket it would give me the lines to cut it. 


Once I had my lines all crumpled, I unrolled the paper (see all those nice little wrinkles that form the outline of where I'll cut out the shape of my bucket?? )  **thinking voice sez this is going too easy...I wonder what will go wrong??** 
I traced a pencil line around the arc that would would be teh bottom of my bucket and cut it out.  (notice the arc cut out??  That's the bottom of the buckt. )  Once I had teh bottom cut, I wrapped the paper around my bucket again, and folded back each side so that it would only be as big around as the bucket, plus enough extra to be a seam allowance.  **Note - see the folds on the left and right??  Thats' where I'll cut it out so that it's only big enough to go around my bucket.**
Next step was to cut off at teh fold line to make sure that it was only as big as the bucket. (This will all make sense in a couple more pictures I promise!)
 So now my pattern is big enough to go around my bucket - but it's not the right height.  So - I wrapped it around the bucket again and folded the excess paper down into the bucket to make a crease at the bucket height only.  (Sorry - my genius is showing. :D) 


Once that part was done, I unwrapped the paper to reveal the beautiful crease for the top of my bucket...


(I didn't take a picture of the pattern when i cut the top off - but you can see my scrap under the bucket. :)  So - now my pattern for the inside piece of my bucket is all cut out - I slid it inside the bucket to make sure it's the right size and shape and...it's perfect!!!  See how it wraps around the insde with just enough overlap to be a perfect seam allowance?? :)  (Again - sorry...my genius is sticking out. :) )


And - see how it's just a hair taller than the bucket??  That's the top seam allowance!!  :)  My plan is that I'll sew the skirt around it...but I'll need something to anchor it to - so...I'll need a seam allowance. :)


So - that's all for the first part of my "plan"...I have the pattern made for the inside of my bucket.  Tomorrow (or maybe later tonight) I'll make up the rest of it and maybe even cut out my fabric??  Oooo - the possabilities!! :) 

Saturday, May 11, 2013

Jeff Gordon / Nascar Cake

Most of my cakes start out with an idea or a sketch.  Many times - it stays in my head and grows as I work on the cake.  The cakes that I have the most fun with tend to become more elaborate than the originaly "plan", while others are sketched out to keep me on track.  For this weekends cake, I started with a sketch.  Ok - not true - I started by surfing the internet for ideas, since this is my first Nascar cake and I really know nothing about Nascar.  I found a few things that stood out - a round blue base, flames, checkered flags etc.  Then - I moved on to my sketch.

Here it is...
 
 
I also took some inspiration from other cakes that I have done - flames from my hunger games cake, the studded collar for my skeleton smash cake and the bull dogs cake, and the number from the hockey cakes.  Overall - I think it will come together nicely.  The base is currently frosted and in the freezer setting up so that I can base coat it in blue and start to work on the flames. :)
 
Fast Forward and here is the finished product...I had originally wanted to do the yellow background of the flames in fondant...but my fondant wasn't cooperating (although it may have been a user problem he-he) so I opted for frosting instead. 

Here's the top view of the cake.  The 24 is sortof a creatie freehand.  I started by drawing a square the same size as the flag.  Inside that, I sketched out the outline of my 2 & 4 and cut them out.  Then - I laid each of the numbers down on the flag and outlined it in black frosting.  I carefully lifted the paper number off - cleaned up the outline where I needed to and piped in the yellow.  Eezy Peezy! 

 I really like the black belt around the base, but it needed a little extra something.  Wanna know how I made them look like little hub caps??  Ok - I'll tell you, but you have to promise not to hold it against. me. :)  I started but cutting out little tiny circles with my smallest circle cutter.  They were too blah - they needed soem detail so...I searched and dug through all of my drawers and finally found...a whiteboard marker!!!  LOL  True story!  I cleaned off the top of the cap and voila!  Instant hub cap!  I pressed it into each circle, brushed on some shimmer dust and ther you have it - teeny tiny hub caps to jazz up the belt! :) 
 
Overall - I think it turned out pretty much how I had planned and they were happy with the finished product, so - I'll chalk it up as another success. :)   If you have a chance, check out my other cakes on my HolleeCakes Facebook page. :)  Recentlly, I seem to be updating that with greater discipline that my blog. :S  Sorry bout that.

Sunday, February 10, 2013

A Fairy cake


What a fun cake to work on!! :)  I did it again, though...I let my creative brain take over, so after about 8 hours of decorating time - I had to simply walk away.  I resigned myself to the fact that that fairies (who are supposed to be Tinkerbell & Periwinkle) look nothing at all like either.  I was ok with that, though, since the rest of the cake turned out pretty freakin great! :)  Before I pass judgement on my work, though, I should really refer to my in house critic - a.k.a. Soapy.  God bless the excitement of the 10 year old girl.  I only wish I could see my work through her eyes. :) she walked into the room and said "Oh!  You made it a Tinkerbell cake!:)"  and then went on to add "And you added her sister too!"  YAY!  Ok - cool...she then went on to explain that the hair I gave her was more like wolverine than Periwinkle, so I had to scrape her head off and start over - but my re-work was given 2 thumbs up and a HUGE grin - so - success!!  I just delivered it so I'm free to post pics now.  :)  I'm so excited about this one - I really wish I could move in to it! :) 

Monday, January 28, 2013

Fun and fondant free...well almost. :)

This passed weekend I had the chance to make another cake for the same family that requested the horse and skateboard cake! :)  There is a big sister who is turning 18 and is very involved in cheerleading.  Her grandmother requested a cheer type cake and sent me several pictures.  In the middle of our planning, though, we ran in to a bit of a catch.  One of the family members requested a cake that you can cut and "not have any fondant"...well...the trouble with that is all the decorative fun stuff comes from what I'm able to do with fondant - EEK!  But - it was still important for the big sister to have a fun cake -so - what to do??  Well...you make a super fun Ombre cake of course! :D  I wish I was able to cut the cake before delivering it so that I could show you the inside too - but...the best I can do is tell you taht the frosting colors on the outside match the cake color on the inside. :)  Once it was frosted, though, it still needed some sparkle and fun - so I dug out the wire swirls and shimmered some fondant and dolled it up just a hair. :)  In the end - I think it turned out pretty darn fun...and you can still cut it "and not have any fondant". :)


Thursday, January 24, 2013

Progress is progress

I started an Afghan a while back and am really excited with how it's turning out. :)  I'll post more as I get more done. :)

Monday, January 21, 2013

YAY BORSCHT!!!

OMG I found it!!!

A few years ago, I started making Borscht – a wonderful Ukrainian beet soup (which delighted the children by turning “everything” purple – hint hint.) About 4 or 5 years ago, though, I found the very best recipe EVER!! It was amazing and super yummy!! Went together great! And I’ve adored it ever since. Last year, though…I lost my recipe. :( I looked high and low with zero luck.  Through some miracle of miracles, I found it on an old USB stick that had been hiding in my desk at work!! YAY CLUTTER!!!  So – in order to avoid the same mishap – I’ll post my recipe here for anyone who would like to give it a whirl!!


I would also like to extend my most profound apologies to the web site that gave me this recipe…if I could find you – I’d totally give credit where it is due (and if I could find you…I never would have lost my favorite recipe.) If I ever do find you – I shall totally link you here (pinky swear!)


Borscht (Funky Beet Soup, and you can dance to it)


Two bunches of beets, about eight beets, 1.5 lbs or so

2 tablespoons butter

1 onion, finely chopped

1 large or 2 small table white potatoes (waxy), peeled and cut into small dice

1 large or 2 small carrots, peeled and cut into small dice

1 litre chicken stock (or you really want to stick to the meatless thing, vegetable stock)

14 oz can tomatoes, chopped, or just used a 14 oz can diced tomatoes

4 bay leaves

good pinch each of salt and fresh-cracked black pepper

1 tablespoon red wine vinegar

1 tablespoon white sugar

1 tablespoon chopped fresh dill, plus more to serve in each bowl

sour cream, a dollop for each bowl

Preheat the oven to 400 F. Cut the greens off the beet, leaving just a tiny stub of the greens, and cut off the pointy root end, near the bulb of each beet. Rinse them under cold water to wash off any dirt, dry them with paper towel, then place them on a large piece of aluminum foil. Fold over the foil and pinch and roll the edges all the way around to seal it well. Place on a baking sheet and in the oven and roast for one hour.

During this time, you can start the rest of the soup. Heat a soup pot over medium heat for a couple of minutes and add the butter. Add the onion and saute for two or three minutes to soften (keep and eye on them - you don't want them to take on too much colour. Reduce heat if that happens). Add the carrot and potato and then then chicken stock or vegetable stock, tomatoes, bay leaves, salt, pepper, red wine vinegar and sugar. Bring to a boil and let simmer.

Remove the beets from the oven and use a knife to open up the foil. Let them cool for 15 minutes or so, so you can handle them. Cut the rest of the greens and the root end off each beet. Use your fingers to squeeze off all of the skin from each beat. Slice the beets into small dice, about the same size you used for the carrots and potatoes, and add them to the pot. Continue to simmer the soup for at least another hour to tenderize everything and really blend the flavours (at this point, the soup can be cooled and stored if necessary). Add a tablespoon of fresh dill 15 minutes before serving. Remove and discard the bay leaves. Ladle hot soup into bowls, add a dollop of sour cream and a sprinkling of fresh dill.

Saturday, January 12, 2013

4 cakes done!!!

I did it!!!  Don't ask me how, but I did...and here they are;

1st is the Plymouth voyager van cake.  I really wanted it to be more realistic than cartoonish - but...to slope the nose right, I'd lose a TON of cake and trust me when I say that the cake that's inside this van is tooo freakin delicious to spare!! :)  It's a triple fudge chunk cake which is crazy moist and dense and delicious!!!  In addition, the frosting that's glueing the thing together is out of this world!!!  I feel guilty for not giving them a side order of insulin with it cuz it's soooooo rich it's crazy!  The frosting recipe goes like this...

combine 1 cup of whipping cream, 1 1/4 c granulated sugar and 1/2 cup of cocoa...whisk it together and bring it to a low gentle boil for 1 minute. Remove it from the heat and...this is where things get crazy - you add 6...I'm sorry - did you say 6??  yes - SIX chocolate baking squares!!!!!  Stir it to melt it all together ( it gets super thick and you'll wanna grab a spoon - and if you do, you're just like me!! :) also - stir in 1tsp of vanilla and let this deliciousness cool till it's room temp.

Nex - whip a package of cream cheese and a cup of butter together until they're...well...whipped! :)  Then add the delicious cooled mixture and mix util it's...well...whipped!! :)  That's it - you'll wanna eat it with a spoon!!  (I did - shhhh!) 

Not only was this one super delicious with diabetes inducing frosting...I snuck some fresh raspberries in between the layers. :)  Yah-hum!!!  So here she is...the story line behind this one is that the birthday boy had a 1995 voyager until recently and it was his baby...but it's gone - moved on to greener pastures! :)  Hence the wings, the halo and the green grass (for greener pastures) :) 

Next are the 3 cakes for youngest kiddo's friend Luca.  She's having her party today with 20 of her friends - eek!!  (imagine 20 ten year olds inside of 1 home!!)  But - she wanted a horse head cake so that's what she got! :)  Her Grammie sent me the link of what she wanted, which was a beautiful grey horse by Gina cakes.  I did my best to come close, but I always struggle with black.  For whatever reason, my black coloring did not want to make black frosting or black fondant today so I had to settle for grey.  I used cocoa to color the bridle though.  I didn't want it all near-black cuz I felt it would need some more color than that. 

The other 2 were for her birthday dinner with Family tomorrow.  Luca is a triplet and has 2 brothers who needed their own cake for their big day! :)  I'm super excited about the skateboard cake!! :)  I think it turned out pretty cool! :) 


Being a girl, Luca wanted her own cake for her family birthday dinner and sent me a pic of the cutest little white horse cake by Kylie Lambert from Le Cupcake.  I'm happy with how it turned out. :) 

Overall, I think they were all a success.  As with every other cake, I learned so much with these 4!  (which is one of the things I love the most about making cakes! :)  Lessons include:

  • Not all icing sugar is created equal.
  • Black is a very hard color to make in frosting and fondant.
  • I'm getting better at smooth frosting.
  • If you spray fondant with water, then sprinkle white sugar all over it - it will stick and look super sparkley pretty! :)

So that's it for this post - my next cake on the list is a Montreal Canadiens cake for a co-worker. :)  I'm really looking forward to it cuz it's chocolate too!! :)

Tuesday, January 8, 2013

An exercise in planning (4 cakes in 1 week!)

Here we go again!!!


This week is sure to be a test of my abilities to plan things well. I have 4 cakes on the horizon. The first is a minivan cake for a co-worker. If all plans go as I hope – it will be a Burgundy 1995-ish Plymouth Voyager with a Superman logo on the hood, angel wings and a halo. :) It’s a smaller cake for 3 people only – BUT – it will be crazy super rich and chocolateeee!!! Plus – there will be lots of fun detail work to keep me plenty busy. Hubby is most excited about possible leftovers. (Can’t say I blame him)

The other three cakes are for a classmate of my youngest kiddo. Her party is on Saturday and she has requested a horse head cake for her party – but…she’s a triplet and has 2 brothers. They will also be having cake with family – so – they will also need a separate skateboard cake for the boys and a small horse cake for the birthday girl.

Yup – that’s 4 cakes alright! Wish me luck!

Sunday, January 6, 2013

Applebee's style ribs

As I get older, I'm becoming more and more aware that I show love through baking and cooking.  One of the most obvious examples of that, is ribs and wings.  I'm not a big fan, but hubby is, so I make them for him as often as I can...it's a little twisted but it makes him so very happy - how could I not? lol  He claims that I make the best wings on the planet, so I figured I would branch out and give ribs a try. 

Yesterday, I grabbed a falt of ribs and did a search for a good ribs recipe.  I found (what appears to be) a great one over at food.com for "Applebee's style ribs"  I sent the link to him and he replied with "I Love you" so I was confident that I had a winner. :)

So - the recipe says:

1.  Place ribs in a large pot and fill pot with enough water to cover ribs.
2.  Bring water to a boil, reduce heat, cover and simmer for 1 hour, or until ribs are fork tender.
 
I cut the ribs into smaller pieces and tossed them into the roaster covered in water. 
 

 I didn't notice till later in the recipe that I should toss in a cup of apple cider vinegar with the water if we wanted them "fall off the bone" tender...oops! I added this at the end so I hope it helped. In the middle of this process, I had to run in town so hubby stepped in to help. In total - I think they boiled for longer than an hour (closer to 2 in fact) so we'll see how it goes. 

I put the sauce together to boil. It said to boil/simmer till it thickened...but it was already pretty thick so I didn't really pay much attention to that part - I just boiled/simmered it till I was ready.
 
 
My kitchen assistant sat nearby, waiting hopefully... 
When they were done boiling - I pulled them out of the pot and layed them on a broiler pan - meat side down. (Like the recipe says)

I wasn't sure if I should put sauce only on 1 side...or both - so - I put it on both sides, but made sure they were back on the meaty side before putting them back in the oven.

 Then I slapped it all over the ribbs - flipped them and slathered with more sauce (cuz I made a double batch that's why) :) I like saucy things. :)  

The recipe also said to broil them 4" to 5" away from heat...I left them a little further down to be honest cuz I was worried about them burning/drying out. (I don't like burnt dried out things)...


I took them out of the oven - flipped them over and slapped on more sauce (I saved some, though, for hubby cuz he always wants extra). Because it was the meaty side cooking this time, though, I raised the rack so that they'll actuall be about 4" away from the heat source. crossing my fingers that it's not a mistake to do this (*insert pretty please dance here*)...
 

and now...they're flipped over and saucy - sitting pretty darn close to the broil element and I've got my fingers crossed (which makes typing a real pain to be honest). :)  

 *fast forward 30+ minutes*

The ribs turned out "great" according to hubby. :)  I thought they were yummy too.  I've never really had ribs before (cuz they're not my preference) but they were prerty good.  (But I don't have anything to compare it to.) 
 
Since we have all enjoyed the ribs (and my kitchen assistant has since realized she is not getting any) she has changed her position and giving quite a thoughtful look. :) As mentioned before - I'm no rib expert...but hubby (who is) gives this recipe a solid thumbs up, so it looks like I'll be making them more often.